

Sims 4 Keep Makeup For All Outfits Mod

I finally finished my custom Styled Looks tutorial! I made sure to cover a lot of details so anyone can follow the tutorial, even if they've never made anything before. If you have any questions though, just contact me!
@maxismatchccworld @thefoxburyinstitute
Tutorial below the cut, example package uploaded here.
October 26th - All S4S bugs related to Styled Looks and SimInfos has been fixed, including the CC bug! I've removed that part of the tutorial now that it is no longer needed (also updated with a new flag to block both hair and makeup, thanks to SimplyAnjuta). Thank you everyone for your patience!
This works on both CC and EA clothes, and is easy to do, but keep in mind that only hats, accessories, makeup, hair, and clothes save, while genetics don't. Hair and makeup has a weird situation though that I will explain below, as it can be turned on and off. In the future I (or Pancake and I) plan to make a program of some sort to make this easier to do. For now though, if you don't care about naming them, etc. you can easily stop at Step 19.
Also, you cannot apply pack requirements to Styled Looks without overriding the client files. You will just have to name a package with its required packs if you release any. Not having a pack (or certain CC) does not break the game though, it just switches out the missing item(s), and if you don't have a thumbnail imported into your package, the generated thumbnail will be a white square with a red X over it in their game. Other than that, the styled looks will still be there, just half or non-functioning.
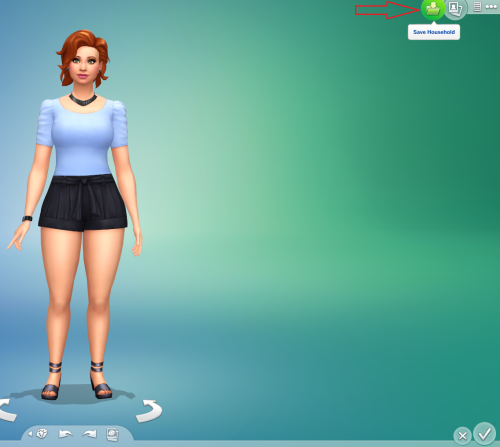
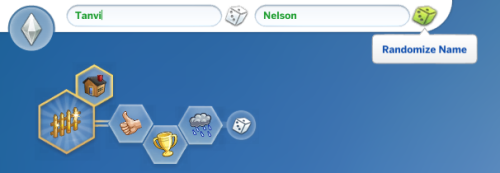
Step 1: For this tutorial I am just going to stick with EA clothes and only 3 swatches to show you the general process (I recommend keeping the number low in general to avoid more work). I'm going to start by selecting New Game, since it doesn't matter what sims I use for this and it's faster, and going to randomly assign her a name, traits, and aspiration (game won't let us move forward until we do), then slap together a semi-acceptable outfit in the Everyday Category. You don't need to make the outfit in any other category because it's based on tags we'll be adjusting later. Once I like what I have for the first swatch I am going to then go up to the top right and click the little folder.
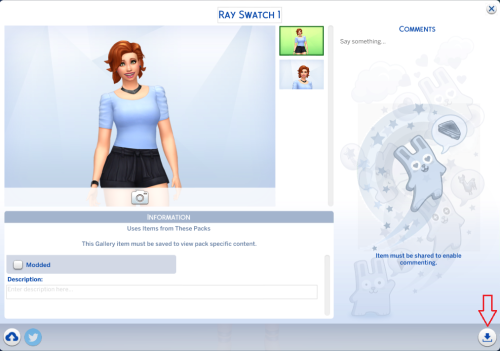
Step 2: Go ahead and name the household something like "(Look name) Swatch 1" then click the "Save Household to My Library" button. Not the gallery, just library.
Step 3: Now make your second swatch by changing the colors of the current outfit (don't bother adding a second outfit to the category), but before saving to the library again you need to randomize a new name to avoid a couple of extra steps. You can also use a naming format for all the sims to keep better track of them.
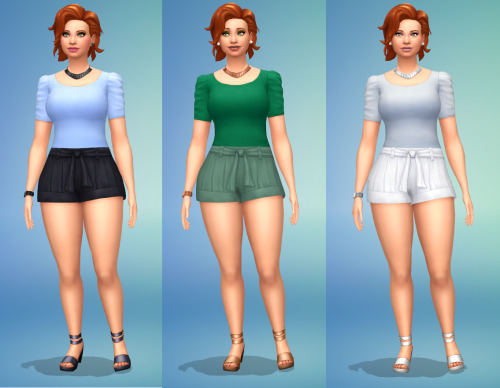
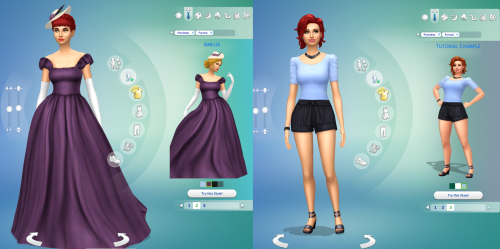
Step 4: Repeat the above steps for your next swatch and so on. I am now done with my 3 swatches, and this is what I put together for this experiment. When you are done just exit the game, you don't need to save.
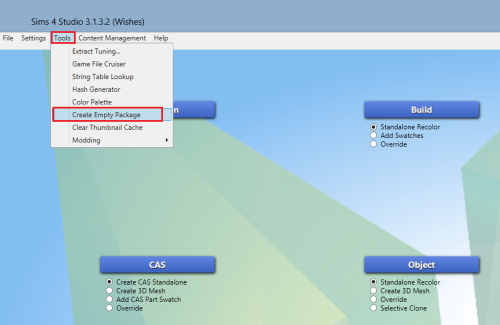
Step 5: Open S4S and create an empty .package by going to Tools > Create Empty Package, give it your creator name and the name of the styled look and save it to a folder just for your Styled Looks.
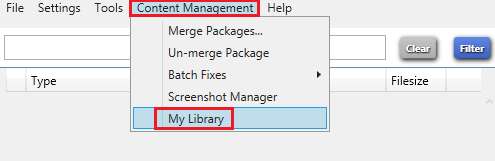
Step 6: Now go to Content Management > My Library (or use the tray cheat). This will bring up your library where you will be able to extract a file called a SimInfo. This file contains the clothing info for Styled Looks.
Step 7: Once the library opens, might take a second depending on the library size, select your first swatch you saved and right-click on the bottom of this blue highlighted icon on the right (the top of the icon doesn't work).

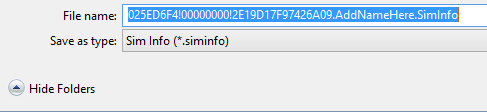
Step 8: Select the "Export .SimInfo" option that appears and save to your work folder without changing the name structure S4S used. If you want to add an identifier so you can tell which swatch is which though, add it after the numbers but before the .Siminfo so that S4S can still read the file. Don't forget to add an additional period so your name has periods on both sides like this: .SwatchName. If you don't want to add a name to the file, just write the longest number (the instance) down along with the color it's for.
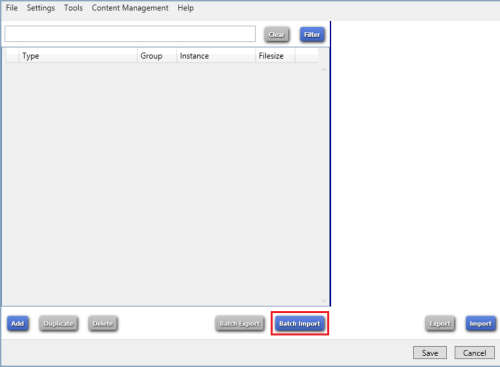
Step 9: Repeat for each swatch you made, then when finished close the library window. Go back to your new package and click the "Batch Import" option at the bottom of the screen. Navigate to the folder you saved the .SimInfo in and select them all to add to your package. Your identifiers you added will be gone when inside S4S, but you can still see which is which by checking your folder where you originally saved them.
Step 10: The next step is to add some pre-made Styled Looks to your package. We do this so we have a base to work off, and because we want to choose a Styled Look with an already matching swatch to the outfits you made. I suggest doing this because adjusting the swatch color manually is annoying and it saves some of the work you will need to do. Anyhow, go to Tools > Game File Cruiser and then find Styled Looks in the filter list and select it.


Step 11: Then just scroll through and search by color, but the name, pack it's from, etc. doesn't matter so don't worry about them when looking. Searching by age and gender as well will save a bit of work though, but I cover how to fix them if you don't. Once you've found one that fits one of the swatches you want, select it, then click "Add to current package" at the bottom right. Once you've found all your matching swatches (same number of .SimInfos) go ahead and close the GFC window.

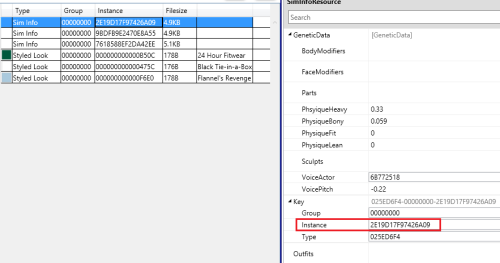
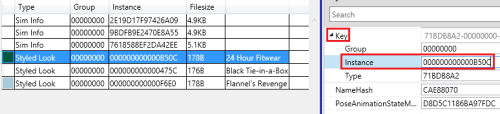
Step 12: Next, we need to match up the Styled Look with the correct SimInfo. Click on your first SimInfo, find the section called "Key" and copy the section labeled as Instance.
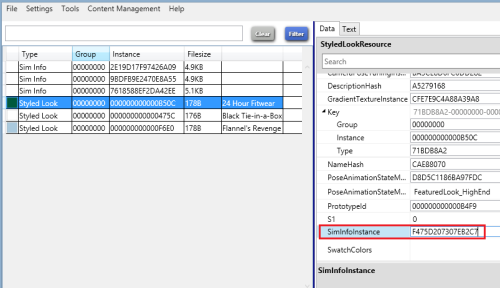
Step 13: Now click on that SimInfo's matching Styled Look and locate the section called SimInfoInstance, then paste the Instance you just copied into this spot. Repeat for each SimInfo and its matching Styled Look.
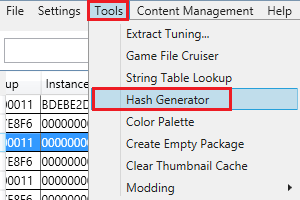
Step 14: The next step is to make the Styled Looks unique and connect them to each other. Go to Tools > Hash Generator.
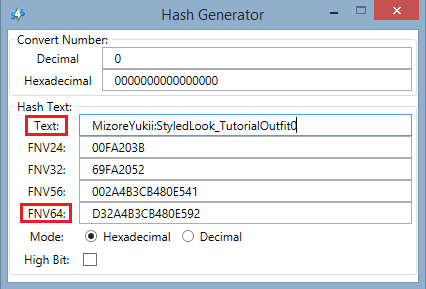
Step 15: A new window will open, start typing a name for your Styled Look into the area where it says Text. You will want to put your creator name, the name of the look, and then put 0 at the end. Copy the FNV64 number it generated.
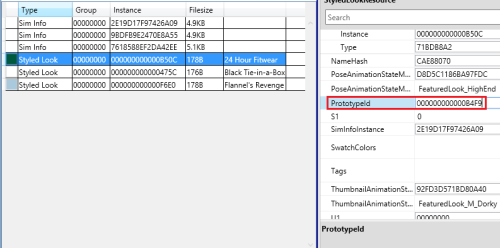
Step 16: Go to your first Styled Look and find a section called "PrototypeID", paste the number you copied into this spot. Do this for every Styled Look you have so they all have a matching PrototypeID. This will connect and group them in CAS.
Step 17: Go back to your hash generator and replace the 0 with a 1, copy the new FNV64 it made and go back to your first Styled Look, find the Key section again and replace the Instance with this new one. Repeat this for each Styled Look, going down the list and increasing the number so it's like 1, 2, 3, 4, 5, etc.
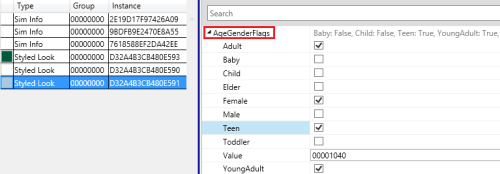
Step 18: We're getting closer to the end! We now need to fix our tags so the items appear in the appropriate category and for the right sims. Click on one of your Styled Looks, then at the very top is an AgeGenderFlags section. Check/uncheck the boxes to fix which sims this look is supposed to be for. Ignore the "Value" box as this is just a number version of the flags. Do this for every Styled Look file you have.
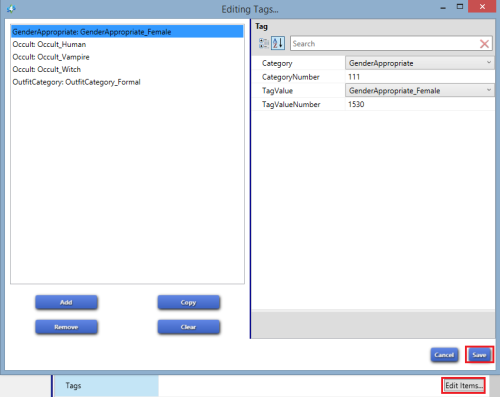
Step 19: Next, go down to the section called "Tags", this is where we will fix the category the outfit appears in, etc. Click the Edit Items button on the right across from the name and a window will open. There will already be some here, you can remove those you don't want by clicking Remove, add more (like more categories) with the Add button (or Copy), or edit the existing values. Make sure you do not add any weird values to the files like build tags. When done make sure you click the Save button at the bottom to exit. Do not exit the window any other way, otherwise your settings won't save. Do this for every Styled Look file you have.
You can stop here if you are only making quick looks for gameplay reasons. There's no reason to do anything else I'm about to cover if you don't care about the details, or the fact that hair is applied as well. If you do care about the details though or want to remove the hair applying so it works like EA looks, and want to customize their appearance in-game further (like posing and custom names), especially if you plan to release these, continue reading.
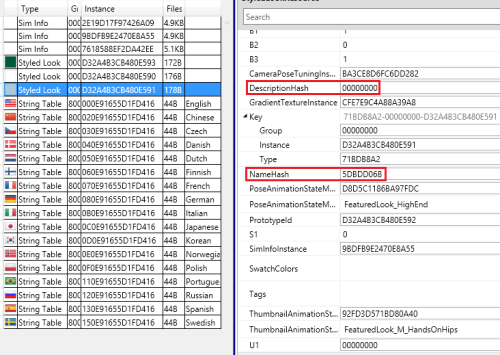
Step 20: The first thing we are going to do for customization purposes is a custom name. There is also an option for a description, but EA doesn't seem to use that option anymore as there is no visible description in-game. Anyhow, you can see this tutorial here about how to add a custom string table and string. Once you've made your new string(s), you can then copy/paste them in the NameHash and/or DescriptionHash section.
This is before I add the new strings:

I then make my string table and strings following the tutorial (make sure to also do the "Copy string tables to all languages" at the end of the tutorial, otherwise other languages will be excluded). I only made a NameHash because there doesn't seem to be a use for the DescriptionHash.

And then here is the after image once I've replaced the two. The NameHash I copied the Key/string I made from the string table and pasted where it says NameHash. For the DescriptionHash I deleted and then clicked away so S4S would autofill it with zeros. Do not delete the string tables after you are done as this is what controls the text you see in-game above a Styled Look, without it there will be nothing to identify it.
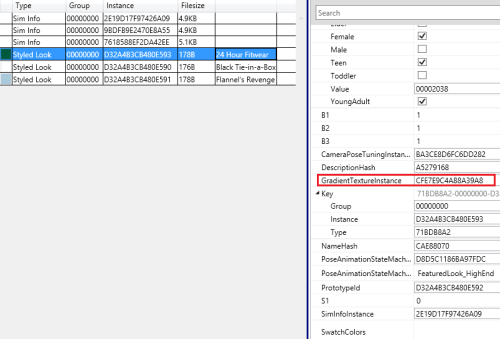
Step 21: The next option you can customize is the background shown behind the sims, which is called the GradientTextureInstance in the Styled Look file. You can copy the instance and use Game File Cruiser to find it, add it to your package, give it a new instance, export the image to customize it, then use the "Import" option on the far right (not Batch Import) to import it when finished. I have a tutorial here that covers some steps if you get lost, but it's mostly the same steps that I covered earlier in the tutorial. If you keep the original size but get a llama image, adjust the image size to be 256x512 instead.
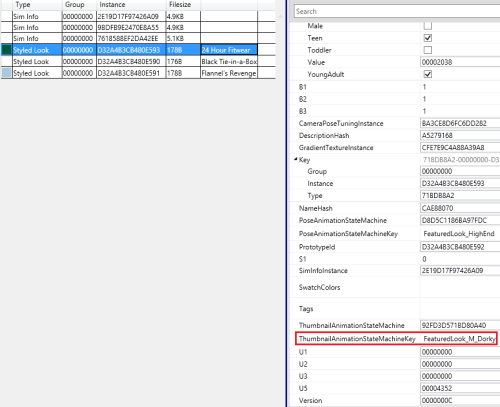
Step 22: Then you can customize the ThumbnailAnimationStateMachineKey, which is what tells the game which pose to use when generating the thumbnail. You can copy/paste a name from this list into that section:
- FeaturedLook_F_CoverGirl
- FeaturedLook_F_Emo
- FeaturedLook_F_FrouFrou
- FeaturedLook_F_HighFashion
- FeaturedLook_F_HighFashion_Back
- FeaturedLook_F_HighFashion_Back_Gown
- FeaturedLook_F_HighFashion_Gown
- FeaturedLook_F_Indie
- FeaturedLook_F_LHandHip
- FeaturedLook_F_LeftSide
- FeaturedLook_F_LegForward
- FeaturedLook_F_RHandHip
- FeaturedLook_F_Sophisticated
- FeaturedLook_M_Candid
- FeaturedLook_M_Confident
- FeaturedLook_M_Dorky
- FeaturedLook_M_Emo
- FeaturedLook_M_Generic
- FeaturedLook_M_HandsOnHips
- FeaturedLook_M_HoldingArms
- FeaturedLook_M_Preppy
- There's also a FullBody, SkinDetail, and TeethDetail but these are for the regular CAS thumbnails. If you know what you are doing you can create your own ASM, poses, and replace the ThumbnailAnimationStateMachine and Key.
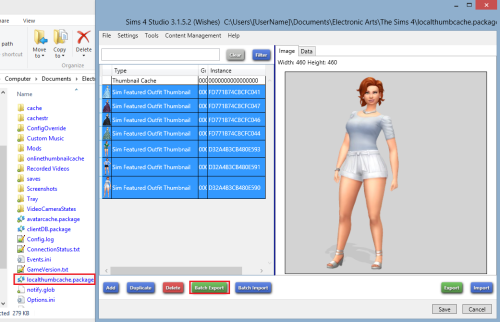
Step 23: Also, if you want to avoid the thumbnail potentially breaking for any reason when generated by someone's game (such as not owning one of the items), you can import the one the game made instead. After you've previewed your outfit in-game, go to your main Sims 4 folder, the one where your mods, screenshots, etc. are located. Inside that folder is a file called localthumbcache, which can be opened by S4S. Open that file and find your thumbnails, then Batch Export them so you can Batch Import them into your Styled Looks package. If you are having issues with what the game generated, try deleting that cache and then go back in-game to re-generate them.
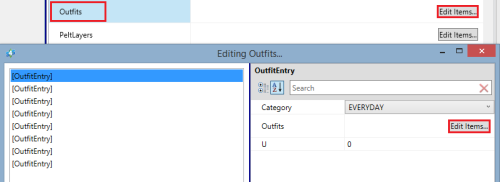
Step 24: The next thing I want to explain is disabling or enabling hair as well as hair + makeup, as I know some people will want this and others won't. When you first extract the SimInfos the hair is automatically enabled for Styled Looks, so the hair you see in the preview is the hair your sim will wear as well. In EA Styled Looks this is disabled. To disable it select the first SimInfo, scroll down to till you see "Outfits" and click the "Edit Items" button across from it on the right. A window will open that says Everyday on the first item, click Edit Items here as well.
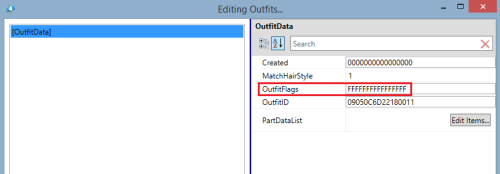
Step 25: A second window will open, replace the FFFFFFFFFFFFFFFF flag in the OutfitFlags with 00000433EFFFFFE2 if you only want hair disabled. If you want hair AND makeup disabled you need to use the 000004100FFFFDE2 flag. Click Save on each window when done to save your work. Then you just repeat for each SimInfo in your package.
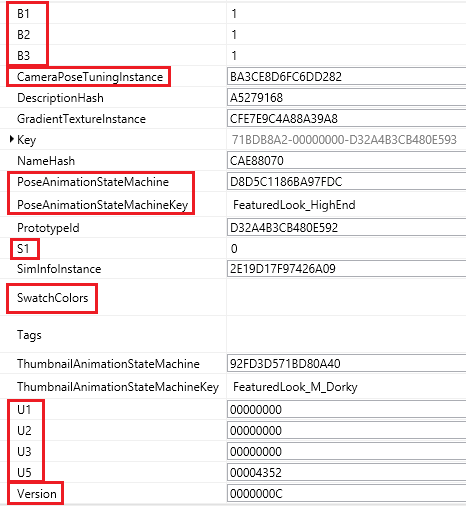
Not a step: The last thing I'm covering is the misc options in the Styled Looks file that people might want to know about.
CameraPoseTuningInstance is always the same in every Styled Look and is used for the thumbnail distance and angle.
PoseAnimationStateMachine is the CAS ASM, it stays the same. However, someone let me know that you can create your own ASM and custom poses for this section as well, similar to the thumbnail. If the game can't find the pose the sim t-poses.
PoseAnimationStateMachineKey is the name of the animation it plays when you select the clothes, it stays the same unless you are using custom poses.
SwatchColors is where you change the color of the Styled Look swatch.
U1, U2, U3 are unknown, and left blank in every file I've looked at.
U5 seems to be the swatch order based on previous testing but counts down the first number instead of up (i.e 000 3 4316 for the first swatch, 000 2 4316 second, 000 1 4316 third, 000 0 4316 fourth swatch). I didn't experiment much with it, but if you want to organize your swatches you would do it here.
S1 is always zero but is otherwise unknown.
B1, B2, B3 don't seem to do anything. Majority of styled look groups have them as 001 for the majority, and then 101 for one of the looks in the group. I tried adjusting these when I first thought they controlled swatch order and nothing ever happened, so not sure what they are for.
Version is just what version the file is, for what the game is currently using/reading. This rarely updates with patches, and usually when it does will still be compatible.
When testing, or using, Styled Looks you may realize you don't want EA's looks because of the number of files you have to go past. I created a hider and uploaded it here if you want to hide them.
And that covers custom Styled Looks! Remember to list any CC and packs you use so your downloaders are aware. If you make any looks, I'd love to be tagged to see what you made!
Sims 4 Keep Makeup For All Outfits Mod
Source: https://mizoreyukii.tumblr.com/post/655000786657574912/i-finally-finished-my-custom-styled-looks
Posted by: brownexciou86.blogspot.com
0 Response to "Sims 4 Keep Makeup For All Outfits Mod"
Post a Comment